Screenshot has really helped during Illustrations of things to readers. It is one important feature of computers that writers and content creators use frequently. As a blogger and book writer, I do make use of screenshot apps and tools frequently. And in this post, I will walk you through on how to take screenshot on Windows 11.
As a writer who has written and published over 30 books, 80% have screenshots in them. This is because I specialize mainly in tech books and I want my readers to understand my books with illustrations. Screenshots are important and that is the reason Windows 11 OS developers assign inbuilt applications that helps us in it.
Ways to Take Screenshot on Windows 11
There are some ways you can take screenshot on a computer that runs Windows 11 Operating System. They are as follow:
- Using snipping tool
- Using Shortcut keys and
- Third party app
How to Take Screenshot on Windows 11 Using the Snipping Tool
Snapping tool is a preinstalled app on Windows 11 Operating System. You can use the application to take screenshot on Windows 11 computers. It allows you to take the part of your PC screen you want to screenshot. I like using snipping tool for most of my illustrations.
With snipping tool, you capture the part of your computer screen you need. You have the option to take part of the screen you want to capture instead of the full screen. This is the advantage it has over other apps that can only screenshot full screen.
Steps to Screenshot with Snipping Tool
I found it difficult to take screenshot on my Windows 11 PC the first time I used it because I did not know the steps to take. Take these steps to screenshot with snipping tool:
- Open the app or any part of your computer you want to capture as screenshot.
- Click on the Search app at the taskbar of your PC.
- In the search bar, type Snipping tool.
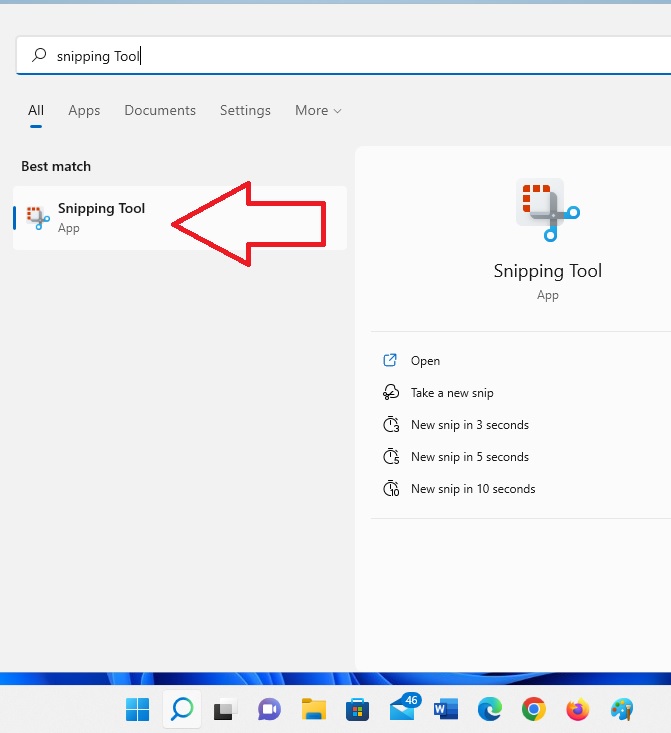
- Select the snipping tool.
- The app will open once selected. It will be positioned at the top of your computer screen.
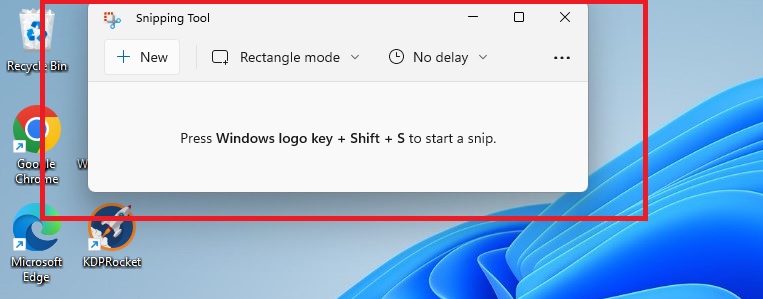
- Select a mode of a screenshot. By default, rectangular is selected.

- The modes are rectangular snip, freeform snip, Windows snip, and fullscreen snip respectively. These are what each of the icons stands for. The rectangular snip which is selected by default will be used here.
- Click on the New
- Take the cursor of your computer to the spot you want to start the capture. Press the left button of your computer mouse, and then drag towards the direction of your computer screen you want the tool to capture.
- Release the pressure on the left button of the mouse, and the selected part of the PC screen is captured.
- You can crop the screenshot or highlight on the screenshot. Just use the tools made available at the bottom part of the snipping tool.
- Click on the ellipsis (the three dots at the top-right)

- Select Save button and save the screenshot in your computer.
How to Take Screenshot on Windows 11 Using Shortcut Keys
Another way you can take screenshot on your Windows 11 computer is using the shortcut keys. I use this approach to take screenshot on Windows 11 PCs.
Follow these steps to take screenshot on Windows 11 using shortcut keys:
- You can press the Ctrl and Prt Sc (positioned at the top-right) keys of your computer keyboard.
- The above action takes screenshot on your computer.
- Open the paint app preinstalled on your computer. If you do not know how to open it, click on the Search app at the taskbar of your computer, type Paint in the search space and click on the app to open.
- Click on the Paste icon of the Paint app for the screenshot to be placed in it.

- You can edit the screenshot using the paint tools.
- Click on the Save button and save the screenshot in your computer.
How to take Screenshot on Windows 11 Using the Xbox Game Bar
Xbox comes with beautiful features and one of them is the ability to take screenshot using the game bar.
Follow these steps to take screenshot using the Xbox game bar on Windows 11:
- Open the Xbox game bar by pressing the Windows logo key and G
- Click on the Capture button which is one of the icons on the top of the screen.
- As some icons are displayed by the left, click on the Take screenshot button
Conclusion
I have walked you through on how to take screenshot on Windows 11 computers. You can work with all the methods or use one.
Leave a Reply